Group and Overhead Paging in ShoreTel - Now Mitel
Something I’ve overlooked for a long time is the paging features ShoreTel comes with. You’ve basically got two options with ShoreTel: Group Paging (over the phone loudspeaker) or Overhead Paging through your public address system.
Group paging is pretty simple to set up, whereas overhead paging can be just about as complicated as you want.
Set Up Group Paging
Group paging is where you dial an extension and it opens up the intercom on a group of phones to make announcements. It’s kind of annoying but it doesn’t need any extra equipment. You’ll want to pick a group of phones you want to use for paging. If you’ve got a cubicle environment you might want to pick one phone per group of five or six people. You can always add more phones later if it isn’t loud enough for everyone to hear. If you have offices you may want them all to open up instead of just a few.
First go into your ShoreWare Director. If you are still entering a username and password, check out my article on Active Directory Integration. It will make your life as an administrator much easier.
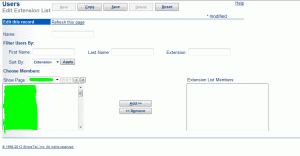
Step 1 – Click on the Users menu to expand it. Then click on “Extension Lists”.
Step 2 – Add an extension list and give it a good descriptive name as to which group it is paging. I like to use the format “Location PG EL”. So if you have an office on say “Adams Street”, I would call it “Adams Street PG EL”. PG stands for Page Group, EL stands for Extension List. I find this makes it a LOT easier to work with.
Step 3 – Open the new Extension List if it doesn’t open automatically and find the extensions you want to be speaking through when you page.
Step 4 – Save your extension list.
Step 5 – Click on “Call Control” and then “Paging Groups” and create a new one.
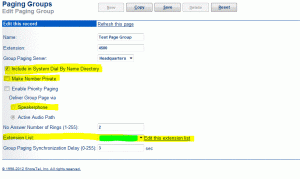
Step 6 – Give it a good descriptive name and extension. Make sure it is on the right server if you have more than one. I’ll explain some of the settings:
Include in System Dial By Name Directory – I’d turn this off as you could get some enterprising hacker to start trying to find page groups on your Auto Attendants.
Make Number Private – This will keep it out of the directory on your phone and Communicator. Not a bad idea actually if you just want a few people to have it.
Enable Priority Paging – I’ve never seen this turned on but you can basically make this page group have priority over others.
Deliver Group Page via – If you turn on priority paging, this is just where it goes out.
No Answer Number of Rings – This is only useful if some of your page group extensions are analog phones. It also determines whether an IP phone is used if it is busy. Two rings are usually fine.
Extension List – Set this to the list you created in steps 2 and 3.
Group Paging Synchronization Delay – You can adjust this if you are having some lag problems. If you are getting echo or delay on your phones, add a few more seconds to this field.
Step 7 – Go ahead and save your page group.
This should get your group paging set up. ShoreTel’s documentation states that group paging is not available to external callers. This is not exactly true on some builds, and may not be true on any build. You can call in from the outside and page. I’ve done this through the voicemail system, the auto attendants, and social engineering. Unfortunately this is one of those security through obscurity things so be careful who you give the extensions to.
Overhead paging is even less secure depending on how you set it up.
Overhead Paging
This is a bit trickier and will need extra equipment. Most of the time you can just hook the phone system right into your PA system through an Audio IN port and you’re done. I won’t go into setting up PA equipment, but the process for hooking your ShoreTel system into your PA system is pretty straight forward.
Step 1 – Run a line from a ShoreTel voice switch’s overhead page port to an input port on your PA system. The ShoreTel port is an 1/8″ jack, and you’ll probably need an 1/8″ male to RCA male cable to do this. Most of your old PA systems use RCA jacks for the input. As there are many kinds of PA systems; what your cabling looks like will have to be determined by you.
Step 2 – Go into Sites in Director, find the site your PA system is on and set the “Paging Switch” to whatever switch you just hooked your PA system into. Put an extension into the “Paging Extension” field.
Step 3 – Hit save.
That should get it working. If you have to enter extensions or something into your PA system (some large school PA systems need you to dial a zone), you’re probably better off just hooking an analog extension into the PA system. I do not think your overhead paging ports are two-way ports so you won’t be able to hear your PA system’s prompts.
Curated by Liquid Layer Networks
At Liquid Layer Web Hosting [LiquidLayer.net], we’ve made a shared web hosting platform that’s both feature-rich and easy to make use of. Our programmers have built up a custom Linux cloud web hosting platform plus an innovative Control Panel that perfectly takes advantage of its capabilities. After long hours of programming and bug fixing on our end, we are now capable to guarantee that all of our shared web hosting services are safe, virus-free, full of capabilities and very easy-to-work-with. In addition, they feature 99.9% server uptime as well as 99.9% network uptime warranties.
Powered by:
HostCheetah Networks
Global Web Hosting, Domain Registration, and Internet Services
https://hostcheetah.net | http://hostcheetah.uk
PC Helper | Est 1996 - Web Hosting | US, AU, UK, Finland, Bulgaria | ![]()
https://pchelper.com


